Clopay, Ideal and Holmes Garage Door EZ-Set Torsion Springs
The EZ-Set system is one of a number of torsion spring winder systems manufacturers have designed for safety. The more common solution for a broken EZ-Set spring is to replace it with the same type. If you want to keep the same system, please review our helpful EZ-Set Torsion Spring Replacement instructions.
If you are handy, and if you are challenged by the risk, you may want to convert your springs to standard torsion springs. Instructions for doing this are on our Double EZ-Set Torsion Spring Conversion tutorial.
Before ordering springs we recommend you review this page. Over the years we have found that informed buyers are happier.
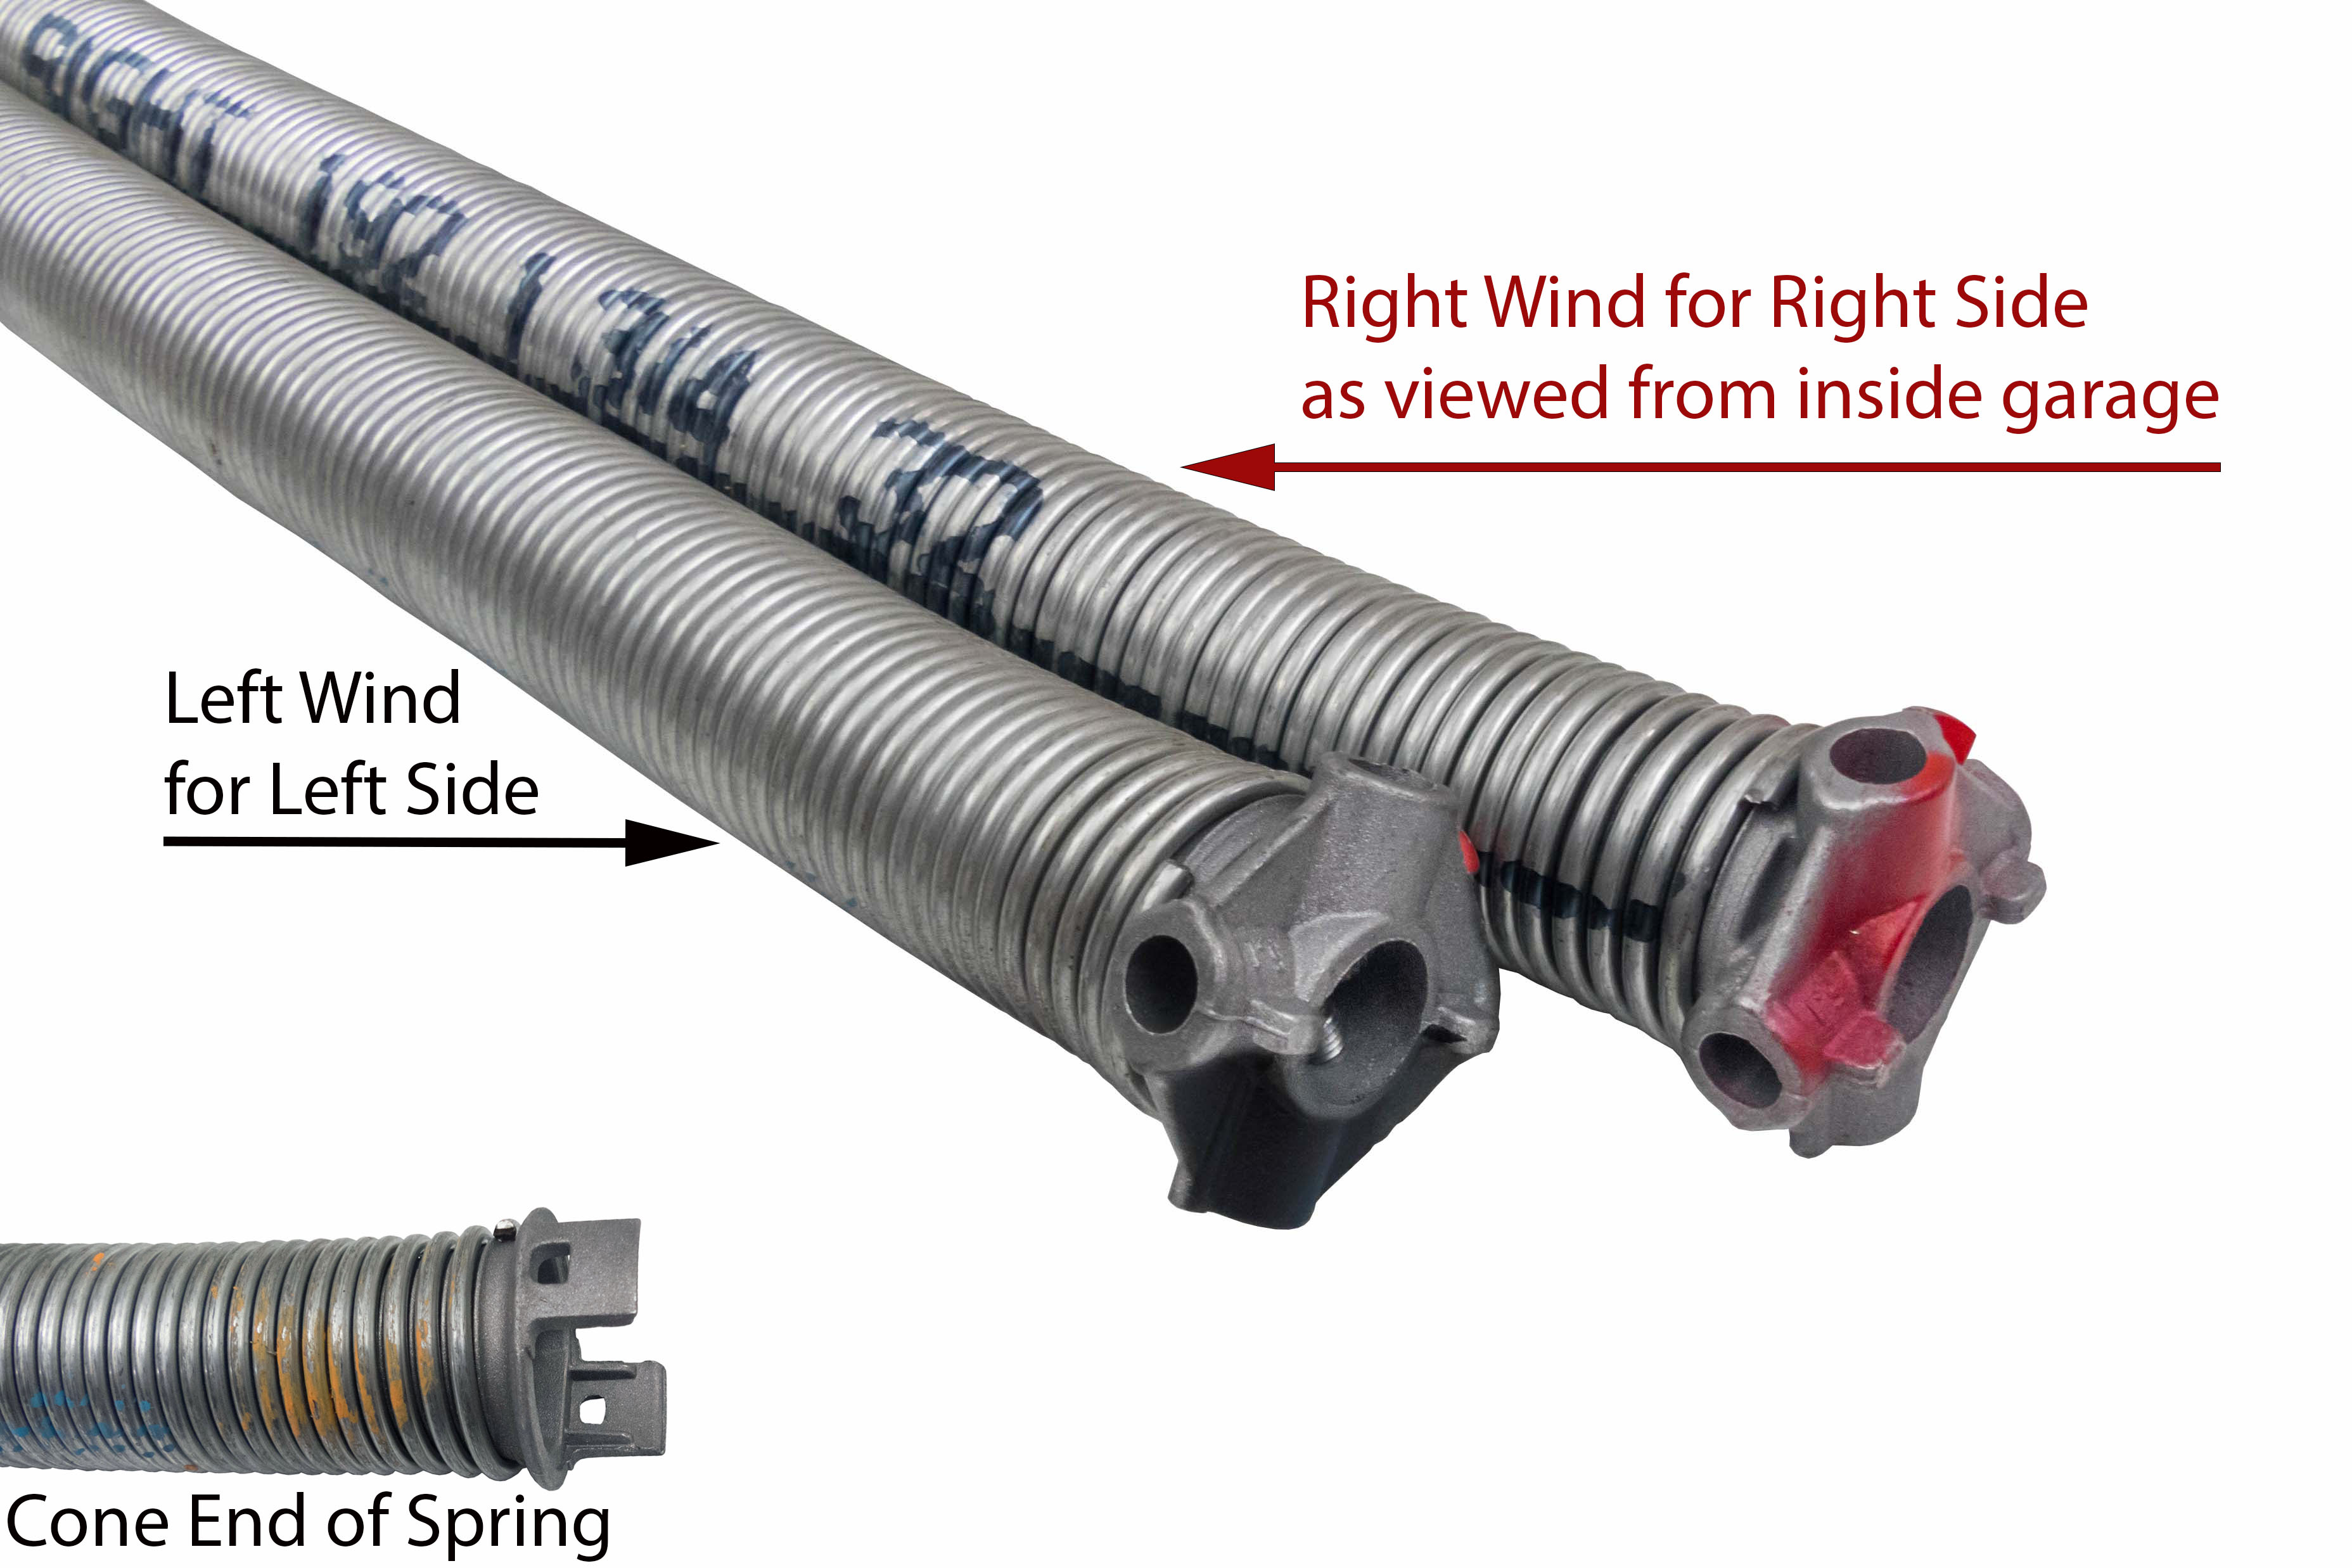
There are three ways to order springs: by Door Model Number, by Door Weight, or by Manufacturer Part Number of the spring. For example, the left wind Yellow A has the part number 0145130. You can order springs at the bottom of this page.
Introduction to EZ-Set Torsion Springs
The EZ-Set Torsion Spring System allows homeowners and do-it-yourselfers to change their own springs much more safely than the standard torsion spring system, using a special winder that requires only a drill.
The EZ-Set Torsion Spring System was first developed by the Ideal Door Company in Baldwin, Wisconsin. Holmes Garage Door Company also uses the EZ-Set system. Both Ideal and Holmes have been purchased by Clopay Building Products Company, Inc. The EZ-Set System is now sold under all three names.
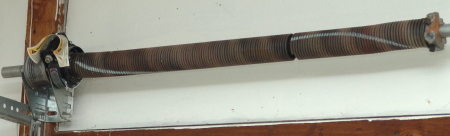
EZ-Set torsion springs use a winding cone, like the one pictured here, as a stationary cone.
Many injuries have occurred over the years from do-it-yourselfers trying to wind or unwind springs with screw drivers instead of winding bars. This system uses a special winder that requires only a drill.
EZ Set springs are specially gapped. One end of the spring fits into the winder. The other end is secured to the shaft with set screws. The spring is wound from the winder end.
For every turn of spring tension the length of a torsion spring increases by one coil. EZ Set springs are specially gapped to allow space for the number of coils to grow as the spring is wound.
Why Standard Torsion Springs Will Not Work on an EZ-Set System
Standard torsion springs have tight coils and no gap. Installing one on an EZ-Set system will typically dislodge or strip the gears inside the winder and break the plastic winder tabs.
On standard torsion springs the coils are tight. These normally grow in length as the spring is wound at the opposite end with the cones that have the set screws. Securing this end of the spring to the shaft first and then winding the other end won't work because there is no space to add the coils as the spring winds. If a standard spring is installed on an EZ Set system, turning the winder will usually dislodge or strip the gears inside.
EZ-Set springs are more flexible than standard springs because they are specially gapped in the factory.
Using a standard spring on an EZ Set system will also break the plastic winder tabs that hold the winder cone. When I first encountered the EZ Set system springs I used a standard torsion spring. I knew not to use the winder because there was no space for the number of coils to grow. So, I wound the opposite end of the spring with winding bars and then I tightened the setscrews. On standard torsion springs the ends of the coils pull toward the center when the door opens and the coils gap. On the EZ Set system, however, a standard spring, secured to the shaft at one end, pulls on the other end. The other end is secured with two plastic tabs. As I opened the door the winder cone pulled out of the winder, the spring unwound, the cables came loose, and the full weight of the door ended up in my lap. That's where I began my education in EZ Set systems.
How the EZ-Set System Works
The EZ-Set Spring has a winder cone on one end which secures to the winder, and a stationary cone on the other end which secures to the shaft. Springs are pre-gapped and held to the proper length so that the coils will not bind as the spring is wound.
The EZ-Set Spring has a winder cone on one end which secures to the winder. The winder is held in place by the end bracket, so the torsion springs are at one or both ends of the door instead of in the middle. The other end of the torsion spring has a stationary cone which secures that end of the spring to the shaft before the spring is wound. On standard torsion spring systems this cone is designated the winding cone — it's wound with bars or rods, and after winding the spring, this cone is secured to the shaft by tightening the setscrews.
One unique characteristic of these springs is that they are manufactured with gaps between the coils. They are also installed with a spacer on the shaft inside the spring. This spacer keeps the torsion spring stretched to its necessary length to allow for an increased number of coils as the spring is wound. Standard torsion springs will not work on these doors because the coils are not gapped. If you stretch a standard spring to obtain the necessary gapping, the winding cone will pull out of the winder, either when you stretch it or when you open the door. EZ-Set springs are pre-gapped and held to the proper length so that the coils will not bind. Unlike standard torsion springs, these springs appear more slinky-like than standard springs.
Key Definitions
EZ-Set Springs & Options
If you have EZ-Set springs, you can replace them with the same type of springs, or you can convert to a standard torsion spring system. If your winders are broken, you can replace, repair, or modify them.
Option 1: Replace Your EZ-Set Springs with the Same Type of Springs
Replacing with the same EZ-Set spring type is usually the most economical way to fix your door, and it lets you keep the safety equipment already in place.
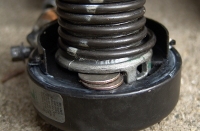
Our EZ-Set Spring Replacement tutorial shows a trick using two quarters to help remove the winder cone from the winder.
This is usually the most economical way to fix your door. Plus, you get to keep the safety equipment. Our instructions for replacing EZ-Set springs will help you with the project. In the tutorial we re-used the existing cones and spacer, but that option is no longer available because we have stopped making the springs.
IMPORTANT: Standard torsion springs like the ones you find at lumber yards and at most garage door companies will not work because they are not gapped, and they will typically destroy the winder.
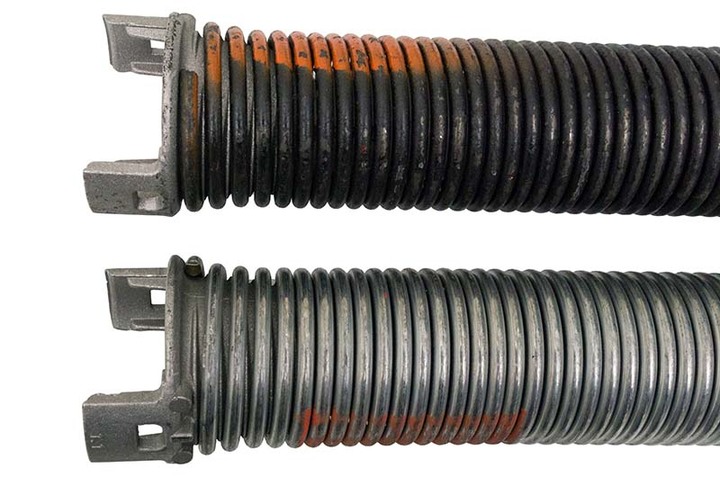
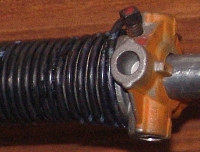
The older black coated spring (top) and the newer galvanized Clopay OEM springs (bottom) that DDM Garage Doors now carries.
Spring Coating History: From Black-Coated to Galvanized
When Ideal Door began selling the EZ Set springs the springs were not coated and they would often rust if not oiled. Later the springs were coated with black paint. Clopay since bought Ideal Door and today they sell only the galvanized EZ Set springs.
DDM Garage Doors used to buy springs in bulk at a good price from a manufacturer in Iowa, and we were able to offer springs with or without the cones and spacers installed. This was a $20 savings per spring for our customers. We also preferred the coated black coated oil-tempered springs because they required less maintenance than the galvanized springs. In the space of one year, however, our cost for the specially-gapped springs doubled. Rather than pass the cost on to our customers, we elected to carry only Clopay's OEM galvanized springs and keep the prices the same.
We no longer stock any of the black coated springs for EZ Set winder systems.
Option 2: Replace Your EZ-Set Springs with Standard Torsion Springs
You may prefer to convert to a standard torsion spring system. The conversion method depends on whether you have one spring or two, and whether you have a single continuous shaft or a two-piece shaft with a coupler.
You may prefer to convert to a standard torsion spring system.
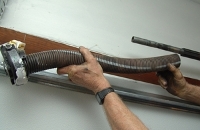
Simple Conversion: One Spring, Single Shaft
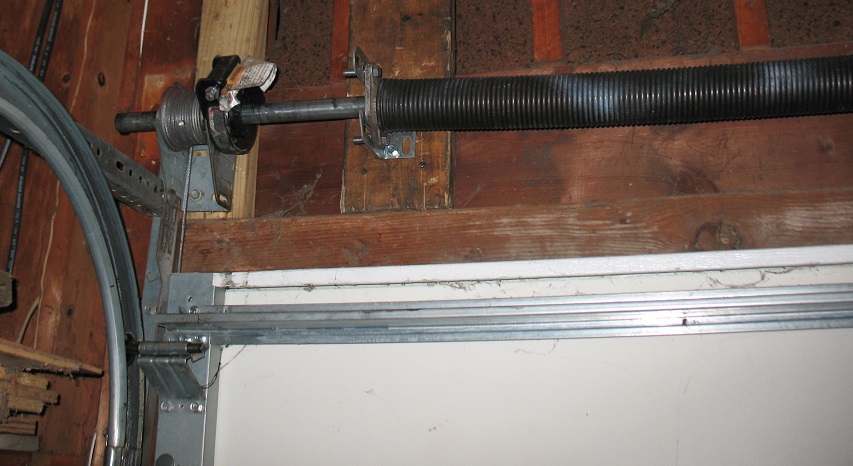
Standard torsion spring mounted to the right of the winder.
To the left is the simplest conversion. If you have only one spring on the door as we show to the left, you can:
- Remove the old spring.
- Install a 2 x 6 pad if needed.
- Install a spring anchor bracket kit next to the winder.
- Secure a new standard torsion spring with standard cones to it.
However, you will need winding bars to wind the spring. The hardest part will be in determining the model or the door weight. EZ Set springs are quite difficult to measure because the coils are gapped.
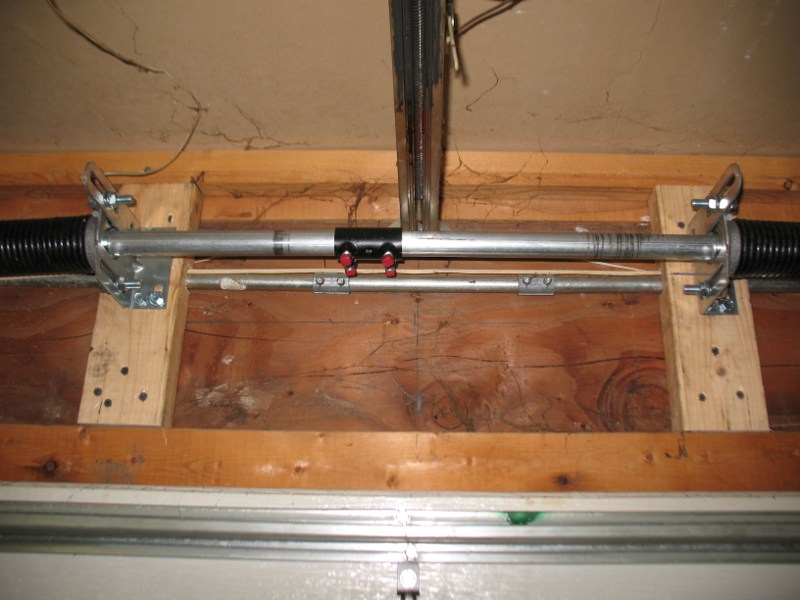
Comprehensive Conversion: Two Springs or Continuous One-Piece Shaft

Hardware required to make the conversion if you have a continuous one-piece torsion shaft.
A more comprehensive conversion involves removing the old EZ Set hardware and installing a new conversion kit that includes new drums, a new spring anchor bracket, and new end bearing plates. If you have two EZ-Set springs on your door, or if you want to convert from one to two springs, and if you have a single continuous one piece shaft that is 16'10" long, you will need to purchase a torsion spring conversion kit for a seven foot high door or a conversion kit for an eight foot high door as you can see on the right. You will also need to purchase one or two of our standard torsion springs. Our Double EZ-Set Conversion tutorial will assist you in converting your hardware.
Conversion with a Two-Piece Split Shaft
Two shafts are often connected in the middle with a coupler.
If you have two EZ-Set springs on your door, or if you want to convert from one to two springs, and if you have a two-piece shaft with a coupler, you can purchase an extra spring anchor bracket kit along with the conversion kit and install the new springs and brackets on both sides of the coupler as we show here. Sometimes extra 2 x 6 wood pads are needed to keep the shaft straight. You'll also need winding bars.
Step-by-Step: Converting to Standard Torsion Springs with a Split Shaft
- Install the end bearing plates.
- Measure from the center of the end bearings to the top of the door.
- Measure and mark this same distance from the top of the door to the 2 x 6 pads or header above the door.
- Identify the center of the spring anchor bracket and align this center with the mark.
- Plumb and secure the spring anchor brackets.
Option 3: Options for Broken Winders
Before ordering new springs, check your winders. If the black plastic tabs are intact, you can reuse the winder. If the cone came out or any tabs are broken, you have three repair or replacement options.
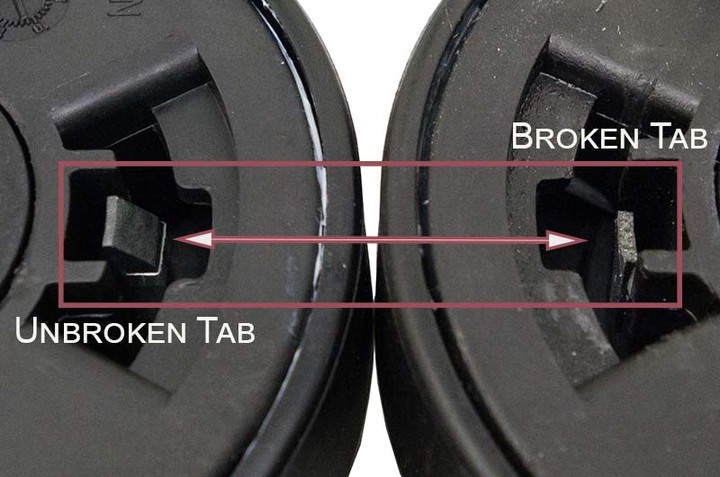
Carefully check the tabs on your winders. If one is cracked or broken, you may want to replace the winder.

Securing the winder cone to the winder allows the customer to use a standard torsion spring that can be wound with winding bars.
Before ordering new springs you need to check your winders. If you have two springs on your door, you'll need to unwind the second spring. Next, remove the winder cones from the winders. Steps 27–37 on our EZ-Set Torsion Spring Replacement tutorial show how to do this.
Check the black plastic tabs in the winders. If the tabs are still intact, you can reuse your winder or winders.
However, if the cone came out of the winder when the spring broke, or if any of the black plastic tabs are broken, you have three options.
Three Options for a Broken or Damaged Winder
Determine Which EZ-Set Torsion Springs You Need
We do not recommend measuring EZ-Set springs because the coils are gapped. The coils on standard torsion springs are tight when they are wound. When they are painted, the paint does not get between the coils. In contrast to this, the EZ Set springs are gapped when they are wound. Because of these gaps paint gets between the coils. If the coils are pressed together to measure 10 and 20 coils, the measurements will not be accurate because of paint between the coils. If galvanized wire is wound, the 10 and 20 coil measurements will also be inaccurate because the galvanizing thickens the wire. This, along with the curve in the coils, also renders measurements made with micrometers and calipers unreliable. Hence, instead of measuring the springs we recommend determining the door model or door weight.
Method 1: Determine Manufacturer and Model
Find the model number sticker on your garage door sections. The location varies by brand and door age. If no sticker is found, contact DDM Garage Doors — sometimes doors can be identified by pictures.
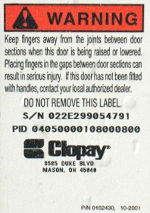
Clopay Serial Number and PID Number which contains the Model Number "4050".
Most of Clopay's new doors have a sticker at the left end of the door, usually on the second section from the bottom, but sometimes the sticker is just above one of the bottom fixtures. Here you will find the S/N serial number. The sticker will also have a PID number in which the model number is embedded as you can see in the image of the sticker to the left.
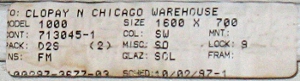
Many garage doors have labels on the sections that provide the model number as you see on this model 1000.
Many of Clopay's older doors have stickers at the top left end of each section. Included on this sticker is the model number, 1000, and the size, 1600 X 700, which is 16' wide by 7' high.
Ideal Door usually fixed labels on the very end of each section at one end of the door. If the door is part way open, you can see the label below the curved portion of horizontal track or above the horizontal tracks. If the door is closed, look behind the vertical track with a flashlight on both sides of the door to find numbers such as S4RSF, M4RSF, S6RST, M6RST, SDP-38 or MDP-38. Normally the labels are at only one end of the door. More information is on our garage door model identification blog.
Many doors with EZ-Set spring systems do not have stickers on them. If you are unable to find any of these numbers on your door just contact us. Sometimes we can identify doors by pictures.
Florida Wind Code Doors: Special Considerations
In Florida, many doors have hurricane bracing and therefore have additional struts attached. The struts are silver metal bars that run across the width of the door that are about 2-1/4" or 3" off the inside face of the door. These doors have a wind code rating which can be determined from the model number. If you have a wind code door you can either weigh your door or call us for help identifying your springs. Door weights for wind-code doors are not included in our door model selections.
After determining the model number of the door you will need to measure the width and height of the door.
Method 2: Determine Door Weight
Weigh the door using an analog scale with both cables loose, the floor level, and the weight evenly distributed on the scale.
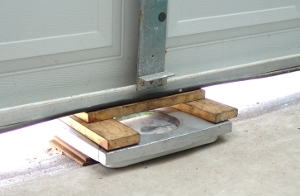
To weigh a garage door, use an analog scale. Both cables must be loose, the floor under the scale must be level, and the weight on the scale must be evenly distributed.
A second way to select the springs you need is to weigh the door. The door weight is determined using an analog scale. See our How to Weigh a Garage Door instructions for accurate weighing instructions.
Method 3: Determine Spring Part Number
The manufacturer's part number for the spring will often be recorded in the original paperwork that came with the door.
A third way to select the spring you need is to determine the manufacturer's part number for the spring or springs. This will often be recorded in the original paperwork that came with the door.
How to Order EZ-Set Torsion Springs
Three Ways to Order
Understanding Spring Description Codes
Spring descriptions use codes to indicate door weight (#), cycle life (k), and wind direction (LW/RW). The industry standard cycle life is 10–15,000 cycles, which usually lasts six to ten years.
The following explanations should help you understand the descriptions for your springs. The "#" sign follows a number that designates the door weight. The number marked by the "k" designates the cycle life rating in thousands of cycles. The industry standard is 10–15,000 cycles. Under normal circumstances these usually last six to 10 years. If your door is in good shape, and if you plan to live in your house more than six years, you will benefit from ordering longer life springs. The "LW" and "RW" designate the winds of the springs. Directions for replacing your springs are at our Single EZ-Set Torsion Spring Replacement page.
| Code | Meaning | Example |
|---|---|---|
| # | Door weight (pounds) | 100# = 100 lb door |
| k | Cycle life in thousands (industry standard: 10–15k) | 30k = 30,000 cycles |
| LW | Left wind | LW = left wind spring |
| RW | Right wind | RW = right wind spring |
Note for Florida Doors: Doors in Florida are often heavier because of extra reinforcements to satisfy wind load requirements. If you have one of these doors, we recommend ordering springs by door weight. If the door is wind-rated and if you order by model number, the springs probably will not work on your door. Check to see if the model number in the serial number is followed by the letter "W" and a number, which is the wind rating. If this is the case, please contact us.
Frequently Asked Questions
What is the EZ-Set Torsion Spring System?
The EZ-Set Torsion Spring System is a garage door spring system first developed by Ideal Door Company in Baldwin, Wisconsin. It allows homeowners and do-it-yourselfers to change their own springs much more safely than the standard torsion spring system by using a special winder that requires only a drill instead of winding bars.
Can I use a standard torsion spring on an EZ-Set system?
No. Standard torsion springs will not work on EZ-Set doors because the coils are not gapped. If you stretch a standard spring to obtain the necessary gapping, the winding cone will pull out of the winder, either when you stretch it or when you open the door. Using a standard spring on an EZ-Set system will also typically destroy the winder.
Why can't I measure EZ-Set springs to determine the replacement?
DDM Garage Doors does not recommend measuring EZ-Set springs because the coils are gapped. Paint or galvanizing gets between the coils, making 10- and 20-coil measurements inaccurate. The curve in the coils also renders measurements made with micrometers and calipers unreliable. Instead, determine the door model number or door weight.
What are the three ways to order EZ-Set torsion springs?
There are three ways to order EZ-Set torsion springs: (1) by Door Model Number, (2) by Door Weight, and (3) by Manufacturer Part Number of the spring. For example, the left wind Yellow A has the part number 0145130.
What brands use the EZ-Set system?
The EZ-Set system was first developed by Ideal Door Company. Holmes Garage Door Company also uses the EZ-Set system. Both Ideal and Holmes have been purchased by Clopay Building Products Company, Inc. The EZ-Set System is now sold under all three names: Clopay, Ideal, and Holmes.
What are my options if my EZ-Set winder is broken?
If the cone came out of the winder when the spring broke, or if any of the black plastic tabs are broken, you have three options: (1) Buy a new winder (approximately $25 each); (2) Secure the winder cone to the winder unit with JB Weld from your local auto parts store; (3) Drill through the winder and winder cone with a 3/16" drill bit and secure the cone with 1/4" x 1" screws, then use winding bars at the other end to wind the spring.
Can I convert from EZ-Set springs to standard torsion springs?
Yes. If you have only one spring, you can remove the old spring, install a 2x6 pad if needed, install a spring anchor bracket kit next to the winder, and then secure a new standard torsion spring with standard cones to it. For two springs or a full conversion with a single continuous one-piece shaft that is 16'10" long, you will need a torsion spring conversion kit for a seven-foot or eight-foot high door. You will also need winding bars.
What do the spring description codes mean (LW, RW, #, k)?
In EZ-Set spring descriptions: the '#' sign follows a number that designates the door weight; the number marked by 'k' designates the cycle life rating in thousands of cycles (the industry standard is 10–15,000 cycles, which usually lasts six to ten years under normal circumstances); 'LW' and 'RW' designate the wind direction of the springs.
