TorqueMaster Springs


Wayne Dalton TorqueMaster Torsion Springs
Order Wayne Dalton OEM Original and Plus Springs
To order Wayne Dalton OEM Original & Plus springs, click the winder type above. Then you will be able to select springs by door dimensions and weight. Once you find the recommended spring or springs, you can add them to our shopping cart. If you have questions before buying or prefer to purchase over the phone, please contact us. On our DIY tutorial page, you'll find our Wayne Dalton TorqueMaster Torsion Spring Replacement Instructions.
How do you order the correct Wayne Dalton TorqueMaster spring?
To order the correct Wayne Dalton TorqueMaster spring, identify whether your door uses the TorqueMaster One Original or TorqueMaster II Plus system, then order by door weight and dimensions, door model number and size, or the spring tube number.
The tube number is often the quickest way to identify the spring, but door weight and model information can also help confirm the correct replacement.
Are TorqueMaster springs dangerous to replace?
TorqueMaster springs are designed to be safer than standard exposed torsion springs because the springs are inside a tube, but they still store tension. Follow proper instructions, use the correct tools, and contact a qualified garage door technician if you are unsure how to proceed safely.
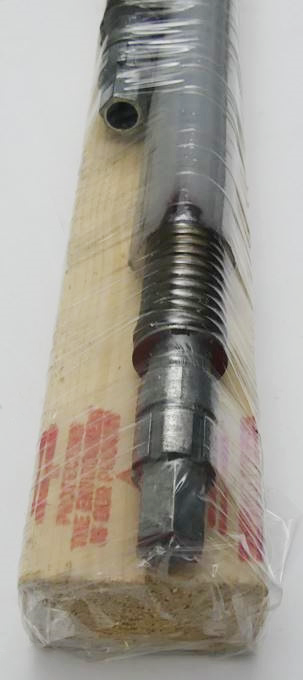
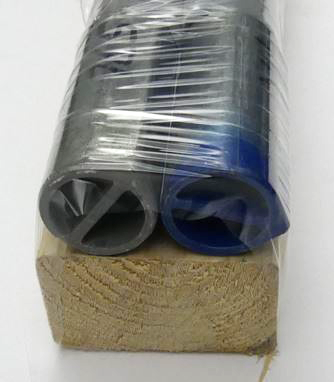
How Your Springs Are Packaged for Shipping
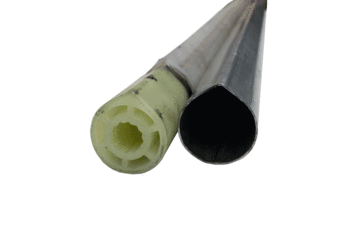
Included with the springs are the cones at each end and the plastic sleeves pictured above. Without the plastic sleeves, the springs can rattle inside the tube.
We also secure the springs to wooden boards, as pictured below, to protect the liner and the internal rod that keeps the bigger springs stretched. These springs cannot be rolled without damaging the rod. A bent rod can break the winder gear or keep the door from working properly.
Same or Next Day Shipping
PLEASE NOTE: SHIPPING TIMES ARE CURRENTLY NOT GUARANTEED, EVEN ON NEXT DAY AND SECOND DAY SHIPMENTS. NORMAL TRANSIT TIMES DO NOT APPLY.
Order by Noon Central Time for same or next business day shipping from our warehouse in West Chicago, IL 60185. The UPS Map will provide your shipping time if you enter our zip code and click the "View Outbound Map" option. Do not include today in the transit time. For example, if you order on Thursday and the map shows two days, Friday would be the first day and Saturday would be the second day. UPS delivers to some residential addresses on Saturday for the same price. These springs are also available for pickup at our warehouse.
Easy DIY Instructions


TorqueMaster Spring Quick Links
How to Order TorqueMaster Springs
In order to find the correct springs, you will need to examine your garage door and gather some information. You may need help for part of the process.
Determine Winder Type
The most critical information you need to determine is whether you have the TorqueMaster One Original system or the TorqueMaster II Plus system. If your torsion springs were installed prior to 1997, you have the original standard TorqueMaster One springs. If your garage door is newer, you may have the TorqueMaster II Plus system.
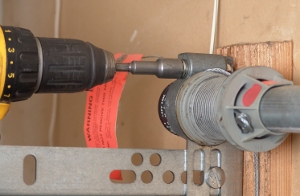
The difference between the two systems is determined by examining the winder. The original TorqueMaster system uses gears, they are wound with a drill and a 7/16" socket or nut driver, and there is a round wheel with numbers from zero to 20 that records the number of turns on the springs. The newer TorqueMaster II plus system uses a ratcheting system and the springs are wound with a 5/8" socket wrench. The number of turns is determined by marking the socket and counting as the spring is wound.
After you determine the type of winder you have, you can decide whether you would like to order springs by door dimensions and weight, door model number and size, or by the tube number.
Order by Door Dimensions and Weight
The first option for ordering TorqueMaster springs is to order by door weight. You will also need to determine the door width and height.
The best way to determine the width and height is with a tape measure. Measure the width of your door, the distance from the right to the left side, and measure the height of your door, the distance from the floor to the top of the door.
The best way to determine the door weight is by checking the sticker on the tube. The more accurate weights are expressed with two decimal points, such as 125.46 pounds. Round numbers such as 150, 200 or 225 are not reliable weights. Also, bear in mind that when new doors are installed, sometimes the wrong spring tubes are installed on the door. If you know your door worked fine in the past this was probably not a problem.
You can also determine the door weight using an analog scale. Digital scales are not reliable no matter how many times you get the same reading because it often takes 20 seconds or longer for the door to settle on the scale. If you have trouble lifting the garage door, or if you cannot lift it yourself, have someone help you. Do not use the opener to lift the door, as you may damage the opener or the door.
Please note that in order to weigh the door, both cables must be loose. You may need to unwind your unbroken spring to loosen both cables and get a reliable reading of your door weight. The opener needs to be disengaged from the door and the arm should be removed to eliminate interference while weighing the door. More information on how to weigh a garage door is on our DIY instructions page.
Information from the Tube Sticker
Usually, there is a sticker on the tube just above the left end of the door, but often it is at the right end of the tube. Sometimes it is necessary to turn the shaft to see the sticker. One way to do this is to open the door a few inches. You can also view the sticker and take a picture of it with your phone.
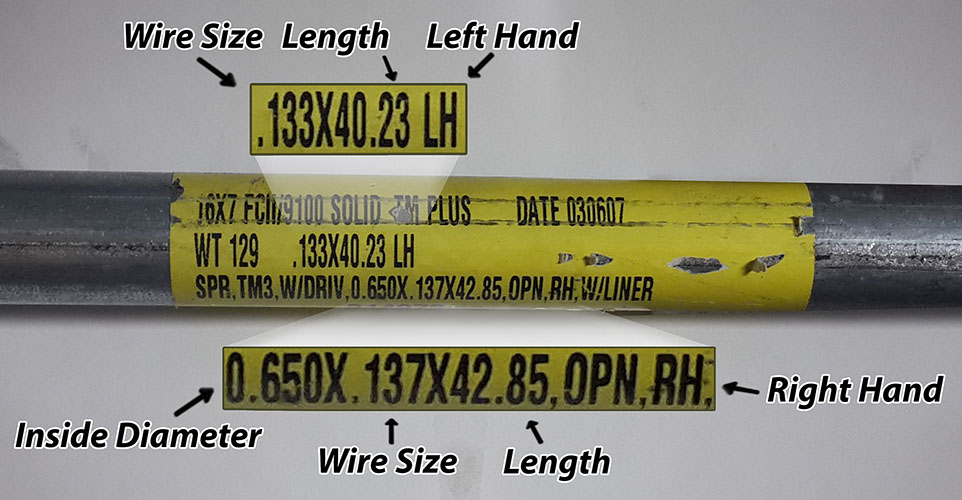
Much of the information on the sticker is unintelligible. However, sometimes it references a door wieght, which is preceeded by the letters "WT" or "BAL WGT." Finding the door weight on the sticker can assist you in purchasing the correct springs above.
The springs, are also listed on the sticker and are identified by a series of numbers separated by the letter "X" - three numbers, an "X," and then two numbers, a period, and then two numbers. Here are some sample numbers to look for on your sticker: SPR.721X146X47.22 LH. The .721 is the older inside diameter of the spring expressed in thousandths of an inch, the 146 is the wire size in thousandths of an inch, the 47.22 is the length of the spring in inches, and the LH tells us the spring is wound left hand. Another example is .65 X .137 x 42.85 RH. The .65 is the newer inside diameter of 65 thousandths, the .137 is the wire size in thousandths, the 42.85 is the length of the spring in inches, and the spring is a right hand wind. Note: The inside diameter for both springs is normally listed only once.
Introduction to TorqueMaster Torsion Springs

Wayne Dalton designed the TorqueMaster spring system for safety; this system allows do-it-yourselfers to install doors without all the dangers associated with standard torsion spring systems. Homeowners can use a drill or a socket wrench to wind and unwind their torsion springs. Besides being safer, this system is easier for the diy-er to install, adjust and replace springs.
When compared to standard torsion spring systems, the hardware for the TorqueMaster systems is unique.
First, the torsion springs are located inside a steel tube about 10 inches above the garage door. You cannot see the springs without removing them from the tube. You can see, however, the winders on these systems. Lighter single car doors have winders at the right end only as you look at the door from inside the garage, and the heavier double car doors have winders at each end of the tube.
The original TorqueMaster One springs use winders with round dials numbered from zero to twenty to count the number of turns on the springs; these are wound with a drill and a 7/16” socket or nut driver.
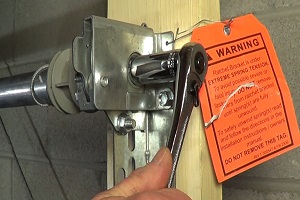
The newer TorqueMaster Plus springs use a ratcheting mechanism and there is no dial for counting the number of turns. These springs are wound with 5/8" socket wrenches. The number of turns is determined by marking the socket and counting as the spring is wound.
Second, in order to fit inside the tube, the spring coils require a smaller inside diameter, and the springs need to be longer than standard torsion springs so they provide the proper torque for balancing the garage door.
The original springs had an inside diameter of .721 inch; the new springs have an inside diameter of .650 inch. The original springs were made of ASTM A229 oil tempered wire; the new springs are made of ASTM A228 music wire. In our tests the music wire has been shown to increase cycle life by at least 40% over oil tempered wire with the same dimensions when subjected to the same stress loads.
Third, the wire size is also is smaller than found in standard systems. Wire sizes range from .110" to .180." Most standard torsion systems start at .187" and often exceed .295" wire.
A fourth unique feature that accommodates the smaller inside diameter diameter and wire size is the smaller moment arm of the cable drums - the distance from the center of the springs to the point where the cables peel off the drums. Wayne Dalton uses cable drums with smaller diameters - roughly two inches - as opposed to four inches on drums for standard spring systems.
Fifth, the smaller drums require increasing the number of turns that are applied to the spring. The length of cable that needs to wrap around the drum needs be approximately the height of the garage door. To get the proper cable length to wrap around the drum, you need more turns on the spring - about twice as many as there are on springs using four inch drums. On seven foot high doors, for example, the springs are wound 16 turns.
Lastly, since the springs fit inside the tubes, they have special, smaller cones on each end to allow for winding. The shape of the inner cone matches the shape of the tube to prevent the inner cone from turning when winding the other end of the spring.
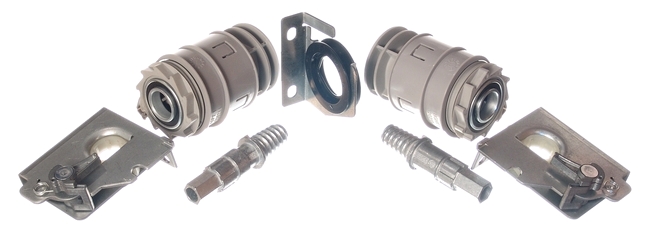
Over the years the cones have changed. The original oil-tempered springs at the bottom of the image below had .721" inside diameters and used black plastic cones at each end. The ends of the cones are round. The .721" ID springs and the cones for them are no longer available from Wayne Dalton.

The manufacturer later switched to music wire and the smaller .650" inside diameter springs that still work with the older worm gear winders. The cones at each end were made with off-white plastic and had round ends. The plastic winding cone was later replaced with the steel winding cones you see in the third images from the bottom. On heavier doors steel cones are used at each end of the spring and a 3/8" rod spreads the coils to allow winding the springs without the coils binding. You can view this rod on our TorqueMaster Cone Replacement video. Replacement springs come complete with new rods, cones and plastic liners.
Wayne Dalton later switched to the TorqueMaster Plus system with the ratchet winder. These cones are visible at the top of the image above. The ends of the winding cones are hex-shaped. The springs on lighter doors use plastic cones; heavier doors use springs with steel cones at each end and internal rods to spread the coils. Doors frequently have steel cones on each end of one spring and plastic cones on the ends of the other spring.
How TorqueMaster Springs Work
1. The small red winding cone on the right connects to the gears in the winding unit. The stationary cone (2) is shaped to fit snugly inside the teardrop-shaped shaft so that end doesn't turn as the spring is wound. When the winding cone (1) is turned and the spring is wound, the winder secures the winding end (1) and the spring transfers torque to the stationary cone (2) which is lodged to the shaft at the other end of the spring.
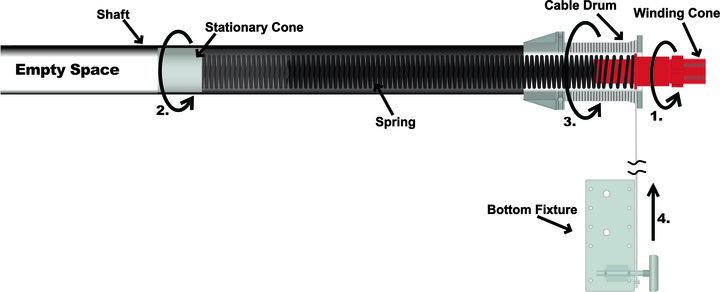
This torque is then transferred from the stationary cone (2), through the tube, to the cable drums (3) which pull on the cables that run to the bottom fixtures (4) at each end of the door. The combined pull on each cable matches the door weight to counterbalance the weight of the door. When the door is fully open, the springs mostly unwind except for one or two turns. This is enough to hold the door in the open position. The principles are the same as you find in a window shade, except that you start with the shade up and you wind the spring as you lower the shade.
Replace One Spring or Both of the Springs?
If you have two TorqueMaster springs on your garage door, we recommend replacing both of them. In most situations, springs break because of metal fatigue; they exhaust their cycles. This means that the other spring is also nearing the end of its cycle life, and it will likely break in the near future.
By replacing both TorqueMaster springs, you will save yourself time; replacing both springs at the same time is faster than replacing each spring individually. Replacing both springs will also save on shipping costs.
All double-wide garage doors have two springs, but most of the single car doors have only one spring, and this is located on the right side. You can determine the number of springs by checking the left end of the tube. If there is a winder at that end, you have two TorqueMaster springs. Otherwise you just have one.
Converting to Standard Torsion Springs
If you already have Wayne Dalton system, it is usually easier and more cost effective to replace your springs with the original parts than to convert to a standard torsion spring system. However, some customers do prefer to convert to a standard torsion system. More information about Wayne Dalton TorqueMaster conversions is available at our DIY instructions page. Converting would cost more and it would be more work, but the main advantage is the longer cycle life options you would have for springing your door.
Additional Wayne Dalton Garage Door Parts
If you need additional parts for your Wayne Dalton TorqueMaster system please visit our Wayne Dalton TorqueMaster Parts page.
TorqueMaster Spring FAQs
What is a Wayne Dalton TorqueMaster spring?
A Wayne Dalton TorqueMaster spring is a torsion spring installed inside a steel tube above the garage door. The system uses winders at the tube ends instead of exposed standard torsion springs.
How do I know if I have TorqueMaster One Original or TorqueMaster II Plus?
TorqueMaster One Original systems use gears, a drill with a 7/16" socket or nut driver, and a numbered counter wheel. TorqueMaster II Plus systems use a ratcheting winder and a 5/8" socket wrench.
Can I order TorqueMaster springs by door weight?
Yes. You can order by door dimensions and weight, but the door weight should be verified carefully. Tube stickers with precise decimal weights are helpful, and an analog scale can also be used when the door is properly prepared.
Should I replace one TorqueMaster spring or both?
If your garage door has two TorqueMaster springs, replacing both is usually recommended because both springs often have similar cycle wear and the second spring may fail soon after the first.
Can I convert TorqueMaster springs to standard torsion springs?
Yes, some customers convert to a standard torsion spring system, but replacing the original TorqueMaster parts is usually easier and more cost effective. A conversion may be useful if you want more longer-cycle spring options.